Archive for the ‘DFMA’ Category
Workshop On Designing Out Product Cost
 October 21st, 2026
This one isn’t a blog post!
After more than sixteen years of blog posts, I’ll host my first live workshop on October 29 at 11:00 am Eastern Time! This marks a new phase for me, and I’m super excited!
In the workshop, I’ll share the tools and approaches for Designing Out Product Cost that I’ve developed over the last 25+ years. Using the methods, I increased profit per square foot by 7X and reduced warranty cost per unit by 4X (see results below), which earned a cover story in IE Magazine. And my results have been published in Design News, ASSEMBLY Magazine, Digital Engineering, IE Magazine, ASME, and I’ve presented them at GE Research and Development, MIT, WPI, and Tuck.
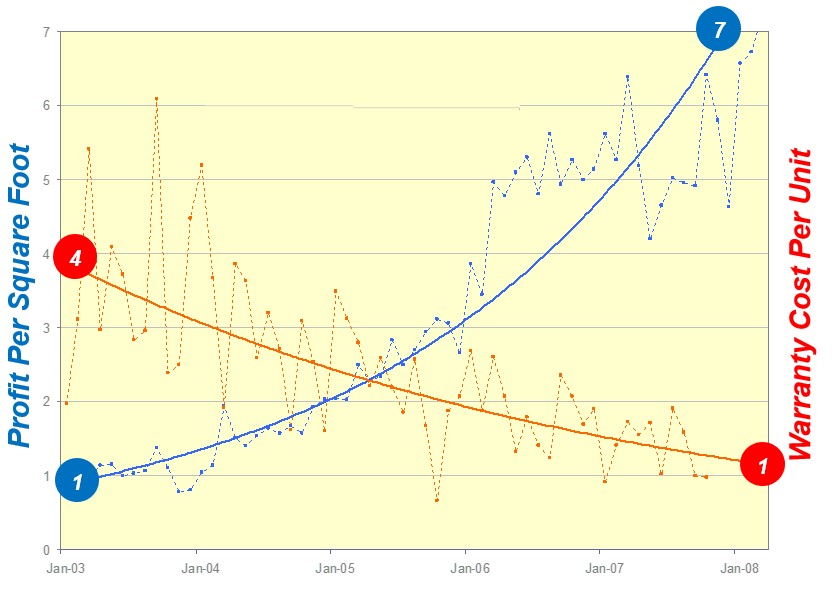
In the workshop, you’ll see real before-and-after examples which will give you a feel for what’s possible; you’ll see real data on part count and cost; you’ll learn how to use data to create a design approach; and you’ll learn the ins and outs of a successful implementation.
And for the first 15 people to register, I am offering a complimentary strategy session after the workshop. To book your 30-minute strategy session, a link will be provided in the registration confirmation email.
Workshop Details
- Topic: Designing Out Product Cost
- Date: 10/29/26 at 11 AM EST
- Price: $100.00
 Posted in A/B Data, DFA, DFMA, Fundementals, How To |
 Tags: Design for Assembly, Engineering Mindset, Product Design, Product Development Engine |
 No Comments »
Product simplification is a battle for hearts and minds.
October 14th, 2026
 With product simplification, it’s a battle for hearts and minds. You cannot simply ask the engineering community to design out half the parts because they don’t think it’s possible. The first step is to help them believe it’s possible.
Posted in Cost Savings, Design Engineers, DFA, DFMA, Downstream Savings, New Thinking, Product Development |
No Comments »
Map The Territory Before Improving It
August 26th, 2026
 I had the best teachers. They taught me to assess the situation as it is before trying to improve it. Early in my career, my leaders did not understand the importance of spending the time to define the current state. Hurry up and fix it! Why are you spending time analyzing the existing product? Why do you want to create a functional analysis of the product we want to obsolete? Why do you want to understand why customers purchased our legacy products?
By assessing the system/products as they are, I learned how to identify the elements to reuse, to improve, and to reinvent. This has been a great way to focus the resources on the most important elements and increase the intensity the allocated resources. When you don’t spend time on the 50% of the system that can be reused, you double the resource intensity over a complete redesign.
So, I ask you – how do you decide what can be reused, what must be improved, and what must be reinvented?
Regardless of the system’s size or scope of the project, assessing the current state is the right first step. For example, there is great interest in improving the business model. First question (that no one can answer) – What is our business model? There are tools to define business models visually to show the partners, competitors, customers, data flow, money flow, product flow. The tools show who does what to whom and how, who helps whom and how, and what’s missing. One of the tools I like is Wardley Maps. While Simon (Wardley) doesn’t talk much about mapping business models, I’ve misused his maps for business model mapping.
A rule for business models: If you can’t describe your business model visually on one page, you don’t know what your business model is and you can’t improve it.
And assessing the current state is effective at the leaf-level (the lowest level). Mapping the system functionally (functional decomposition with Axiomatic Design) and defining a problem rigorously (TRIZ), allows the team to place the problem in the context of the whole system AND to define the problem at the smallest level possible (think telescope to microscope).
A rule for problems – There’s nothing worse than solving the wrong problem, so you better be sure you’re solving the right one.
A long time ago, I led a project that took the time to assess the baseline product (existing product) for cost, part count, and part type. Using DFMA, ee knew where the parts were, and we designed them out and we knew where the cost was and we designed it out. It took a “long time” to do that work, but we radically improved the profitability of the new product (7X improvement in profit per square foot of the factory). We also did a full functional decomposition on the baseline product and learn that there was one subsystem that caused trouble with all the electronic systems and created problems for customers. We hardened the design against that subsystem’s devilish energy. And we created robustness tests where we tested the baseline product and demonstrated improved robustness on the new product. (We used TRIZ to solve the right problems.) Those efforts reduced warranty cost per unit by 4X.
Rigorously assessing the current state (products, processes, systems, business models) seems too slow and a big waste of time. It is my experience, though, that it’s faster and improves the outcomes of the new product development and improvement projects.
But don’t take my word for it. Give it a try. And if you need some help, let me know.
Image credit – Calsidyrose
Posted in Business Model, Cost Savings, DFMA, Downstream Savings, Fundementals, How To, Manufacturing Competitiveness, Product Development, Product Robustness, Seeing Things As They Are, TRIZ |
Tags: Design for Assembly, DFMA Culture, Manufacturing Competitveness, Part Count, Problem Definition, Product Development Engine |
No Comments »
Designing your new product starts by understanding your existing one.
July 29th, 2026
 Everything starts from what’s been done before. Designing a new product starts with assessing the subassemblies of your existing product. Here’s how the assessments go for the subassemblies.
First, make two Pareto charts: cost by subassembly and part count by subassembly. Prioritize the subassemblies on the left of both charts.
If the functionality is sufficient and the cost is right, reuse it as-is. This allows you to spend your time and energy elsewhere.
If the cost is right but the functionality needs to be adjusted, adjust it and move on. The technical risk is low, and the cost will still be right. Spend your energy where the problems are.
If functionality is good and the cost is high, simplify the product using part count reduction. Create a bench test to verify functionality and robustness are better than the old one.
If the functionality is insufficient and the cost is too high, spend your energy here. Create a bench test to quantify the performance of the existing subassembly. Turn up the dials to increase the stress on the subassembly until it breaks. Fix the part that breaks. Repeat until you run out of time. Create two Pareto charts for the subassembly: cost by part and part count by part type (main part, fastener, connector, protection, label). Design out the highest cost parts and redesign the highest cost parts that remain. Design out fasteners, connectors, protection parts, and labels.
Create a functional test for the product as a whole (think miles per gallon for a new car) and test the old one until it breaks. Build the new product with the new subassemblies and test it until it breaks. The performance must be better, and it must perform under stress longer than the baseline product. Break the new product, fix the weakest link, and retest. Do this until you run out of time and launch it.
This is The Way.
Image credit — George Redgrave
Posted in Clarity, Cost Savings, DFA, DFMA, Floor Space, Fundementals, How To, Manufacturing Competitiveness, Part Count Reduction, Product Development, Product Robustness, Risk, Seeing Things As They Are, Seven Wastes, Top Line Growth |
Tags: Design for Assembly, DFA, DFMA Culture, Downstream Savings, Engage Design; Product Design; Cost Savings, Manufacturing Competitveness, Product Design, Understanding Physics |
No Comments »
Product-First Thinking – A Way To Accelerate Growth
May 27th, 2026

This is the third in a series of blog posts on transformation (changes that make a difference). The first post described the power and benefit of focusing on the current state at the expense of the future state. The second post described moving from dilution to distillation, where resources focus on fewer things to create intensity of resource allocation. The topic of this third post is moving from process to product.
There is immense pressure on company leaders to grow their businesses. And with new competitors and a faster pace of change, it’s harder than ever to grow. The growth from process-first thinking (Lean Manufacturing and Six Sigma) has reached maturity, and the returns have diminished. It’s time to take a product-first approach.
Lean improves our processes by simplifying them; Six Sigma improves our processes by reducing variation. But customers don’t buy our processes; they buy our products. Bad process and good product – sale. Good process and bad product – no sale. And more sales create top-line growth.
Products solve problems for customers and help them make progress, which is why customers buy our products. Customers buy our products, not our processes, and that’s why I think we should take a product-first approach.
When your product works better than the competition, you sell more. When your internal process is better than the competition, customers don’t really care, and you don’t sell more. Sell more, grow more.
The sales-driven growth described above is all about the top line. And for top-line growth, I think product-first is far better than process-first. But product-first is also far better for bottom-line growth.
Lean can reduce labor costs by 30%. Labor cost is likely about 5% of your product cost. Do the math, and that’s a cost reduction of 1.5%. Note – labor savings can be realized only when people lose their jobs. I won’t bother calculating the savings from Six Sigma because they are less than the savings from Lean.
Product simplification through part count reduction can reduce material cost by 20-40%, and material cost is likely around 80% of your product cost. Do the math, and that’s a 16-32% cost reduction for the entire product. This level of cost reduction can grow profit per unit by 50-100% (not a typo). That is radical bottom-line growth. Product beats process hands-down.
I bashed process-first thinking to make the point that product-first is more important. But process thinking IS important, though I think it should come after product thinking. Softening the message I delivered above, I think it’s product BEFORE process.
Here’s my recommendation. Improve product function, design out half the parts, and introduce a low-waste design into the production system. Then, use Lean to streamline the process, and then use Six Sigma to reduce variation.
Here’s the magic sequence that delivers growth: product function, product simplification, process waste reduction, process variation reduction.
This is The Way.
Image credit – Ray in Manila
Posted in Bottom Line Growth, DFA, DFMA, Lean, Product Development, Six Sigma, Top Line Growth |
Tags: Design for Assembly, DFMA Culture, Part Count, Product Design |
No Comments »
Double-Barreled Profitability
May 6th, 2026
 The need to grow revenue and profit is ever-present. And as the pace of change accelerates and competitors elevate their game, it’s getting more difficult.
Growth must be built on top of your best work. To grow, you must develop new products and services that make your customers swap out the old offering they just bought from you for the new one you just launched. And you must develop the new product with the team that developed the old one. This is difficult. You need to create the conditions for the team to see their best work as crap and prevent them from seeing themselves as crap.
For customers to replace an existing product with a new one, the new product must help customers make more progress than the old one. In a word, the new one must be better, or customers won’t buy it. And if they don’t buy the new one, there can be no growth. But here’s the difficult part – when the team built the old one, they designed in as much goodness as possible, yet your task is to help the team design a better one. Hey Team, congratulations on the wonderful success of the existing product. You did new work in new ways; you stretched; you hustled; you sprinted. Now, you must outdo yourselves, even though you just did that. This is quite the balancing act for the engineering leader.
Growth comes when the team designs a product that works better than the one they designed last time.
Designing a new product that works better is only half of the profitability recipe. It must also cost less. Yes, it must work better AND cost less. Yes, I said AND. Most teams don’t believe they can design a new product that costs less, and they think you’re crazy when you tell them the new one must work better and cost less. But this type of double-barreled profitability improvement is possible and proven. But only if the engineering leader believes it. And most don’t.
Growth is realized when the team designs a new product that works better AND costs less.
You can radically improve profitability with this double-barreled approach. I’ve used it to more than double the profit per square foot of the assembly area. And that makes the CFO smile and gets you lunch with the CEO. It’s good for profitability and better for your career.
Radical growth comes from obsoleting your best work, but only if you think it’s possible.
Image credit — Don Miller – double rainbow
How I Develop Engineering Leaders
May 14th, 2025

For the past twenty-five years, I’ve actively developed engineering leaders. Here is the curriculum in the form of How Tos:
How to build trust. This is the first thing. Always. Done right, the trust-based informal networks are stronger than the formal organization chart. Done right, the informal networks can protect the company from bad decisions. Done right, the right information flows among the right engineers at the right time so the right work happens in the right way.
How to decide what to do next. This is a broad one. We start with a series of questions: What are we doing now? What’s the problem? How do you know? What should we do more of? What should we do less of? What resources are available? When must we be done?
How to map the current state. We don’t define the idealized future state or the North Star, we start with what’s happening now. We make one-page maps of the territory. We use drawings, flow charts, boxes/arrows, and the fewest words. And we take no action before there’s agreement on how things are. The value of GPS isn’t to define your destination, it’s to establish your location. That’s why we map the current state.
How to build momentum. It’s easy to jump onto a moving steam train, but a stationary one is difficult to get moving. We define the active projects and ask – How might we hitch our wagon to a fast-moving train?
How to start something new. We start small and make a thought-provoking demo. The prototype forces us to think through all the elements, makes things real, and helps others understand the concept. If that doesn’t work, we start smaller.
How to define problems so we can solve them easily. We define problems with blocks and arrows, and limit ourselves to one page. The problem is defined as a region of contact between two things, and we identify it with the color red. That helps us know where the problem is and when it occurs. If there are two problems on a page, we break it up into two pages with one problem. Then we decide to solve the problem before, during, or after it occurs.
How to design products that work better and cost less. We create Pareto charts of the cost of the existing product (cost by subassembly and cost by part) and set a cost reduction goal. We create Pareto charts of the part count of the existing product (part count by subassembly and part count by individual part number) and define a goal for part count reduction. We define test protocols that capture the functionality customers care about. We test the existing product and set performance improvement goals for the new one. We test the new product using the same protocols and show the data in a simple A-B format. We present all this data at formal design reviews.
How to define technology projects. We define how the customer does their work. We then define the evolutionary history of our products and services, and project that history forward. For lines of goodness with trajectories that predict improvement, we run projects to improve them. For lines of goodness with stalled trajectories, we run projects to establish new technologies and jump to the next S-curve. We assess our offerings for completeness and create technologies to fill the gap.
How to file the right patents. We ask these questions: How quickly will the customer notice the new functionality or benefit? Once recognized, will they care? Will the patent protect high-volume / high-margin consumables? There are more questions, but these are the ones we start with. And the patent team is an integral part of the technology reviews and product development process.
How to do the learning. We start with the leader’s existing goals and deliverables and identify the necessary How Tos to get their work done. There are no special projects or extra work.
If you’re interested in learning more about the curriculum, send me an email at mike@shipulski.com.
Image credit — Paul VanDerWerf
Posted in A/B Data, Allocating Cost, Bottom Line Growth, Clarity, Cost Savings, Design Engineers, DFA, DFMA, Engineering Leaders, Fundementals, How To, Innovation, Maps, One Page Thinking, Part Count Reduction, Problems, Product Development, Product Robustness, Technology, The Future, Trust |
Tags: Cost Reduction, Cost Savings, Design for Assembly, Engage Design; Product Design; Cost Savings, Fear, Part Count, Problem Definition, Problems, Product Design, Product Development Engine, Trust-based approach, Understanding Physics, Words |
No Comments »
How To Reduce the Tariff Signature of Your Supply Chain
April 9th, 2025
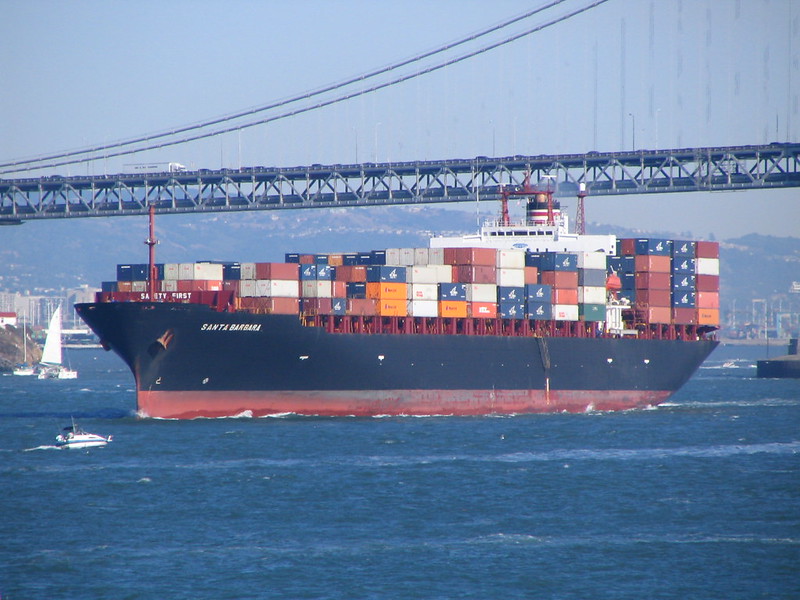 Supply chains have taken it on the chin, first from COVID-19 and now from tariffs (or the threat of them). For the second time in several years, we have objective evidence there is more to a supply chain than implementing the lowest-cost way to meet predictable demand. Tariffs have highlighted the cost of an inflexible supply chain because we can quantify the savings from moving parts to countries with lower tariffs.
With tariffs, Lean’s mantra of “make it where you sell it” has sharper teeth.
At the most fundamental level, supply chains are governed by the parts. Big parts, big factories; small parts, small machines; high part volume, high volume processes; low part volume, low volume processes; specialized coatings on the parts, specialized suppliers; parts with proprietary materials, sole source supplier. The supply chain is defined by its parts. And when you try to move the manufacture of parts from one country to another, these part-based constraints are the very thing that creates supply chain inflexibility. Said another way, if you want to improve a supply chain’s flexibility, you’ve got to start with the parts. If you want to reduce the tariffs of your supply chain, start with the parts.
All the parts in the supply chain are important but with tariffs, some parts are more important than others. You can make significant improvements in your supply chain’s tariff signature if you know the handful of parts that will deliver the largest tariff reduction. For each part within your supply chain calculate
(material cost x volume x tariff percentage)
and sort the product from largest to smallest. For the top ten parts assess the part-specific constraints that governed the original decision of the supplier and country. For each part identify a country with lower tariffs and pair it with the part-specific constraints. You now have a list of the top ten opportunities to reduce the tariff signature, what must change in the design to move to a lower tariff location, and the entitlement savings. The DFM-based tariff savings for each part is
(part cost x volume x difference in tariff percentage).
Take your top ten list to the product owner and show them the potential savings and ask to meet with the design community so you can explain how each part must change so it can move to a lower tariff country. And tell them how much the company will save if those constraints are overcome. This is like classic Design for Manufacturing (DFM) where the part is changed to reduce the cost to make the part, but, instead, the part is changed to reduce the cost of tariffs.
You now have a playbook for the top ten parts, the estimated tariff savings, and the work required to realize those savings. You don’t have to implement the playbook, but you can. And you can repeat the process for the next ten most important parts (11-20). Now you have a playbook for twenty parts and the estimated savings. You can continue the process as needed and step through the list ten parts at a time.
The process I describe is a good way to reduce the cost of tariffs. But to make a dent in the universe, there’s a much better way. It’s called Design For Assembly, or DFA, which is all about product simplification through part elimination. 35% reductions in the number of parts are typical. With DFA, high-tariff parts aren’t changed, they’re eliminated. But where classic DFA prioritizes eliminating the highest-cost parts, tariff-based DFA prioritizes eliminating parts with the highest tariff costs. The calculations to prioritize DFA-based tariff reduction are similar to those for DFM, but the savings are far more severe – the entire tariff and the part cost are saved. The DFA savings are
(part cost x volume x tariff percentage) + (part cost x volume)
Run the calculation for the parts in your supply chain and sort the results from largest to smallest. Take the list of the top ten to the design community and show them how much they can save if they eliminate the parts. Tell them they’ll be the Heros of the Company if they pull it off. Tell them you help them get the tools and training they’ll need. Repeat for the second group of the ten most important parts (11-20).
DFM and DFA are wildly profitable and with the added savings of tariffs, the savings are beyond wild. If there was ever a time to do DFM and DFA, it’s is now.
Image credit — Derell Licht
Posted in Cost Savings, DFA, DFMA, Fundementals, How To, Lean, Manufacturing Competitiveness, New Normal, Seven Wastes |
Tags: Design for Assembly, DFA, DFMA Culture, Engineering Capability, Product Design |
No Comments »
If you want to make a difference, change the design.
October 9th, 2024
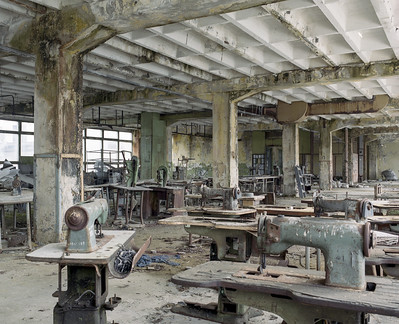 Why do factories have 50-ton cranes? Because the parts are heavy and the fully assembled product is heavier. Why is the Boeing assembly facility so large? Because 747s are large. Why does a refrigerator plant have a huge room to accumulate a massive number of refrigerators that fail final test? Because refrigerators are big, because volumes are large, and a high fraction fail final test. Why do factories look as they do? Because the design demands it.
Why are parts machined? Because the materials, geometries, tolerances, volumes, and cost requirements demand it. Why are parts injection molded? Because the materials, geometries, tolerances, volumes, and cost requirements demand it. Why are parts 3D printed? For prototypes, because the design can tolerate the class of materials that can be printed and can withstand the stresses and temperature of the application for a short time, the geometries are printable, and the parts are needed quickly. For production parts, it’s because the functionality cannot be achieved with a lower-cost process, the geometries cannot be machined or molded, and the customer is willing to pay for the high cost of 3D printing. Why are parts made as they are? Because the design demands it.
Why are parts joined with fasteners? It’s because the engineering drawings define the holes in the parts where the fasteners will reside and the fasteners are called out on the Bills Of Material (BOM). The parts cannot be welded or glued because they’re designed to use fasteners. And the parts cannot be consolidated because they’re designed as separate parts. Why are parts held together with fasteners? Because the design demands it.
If you want to reduce the cost of the factory, change the design so it does not demand the use of 50-ton cranes. If you want to get by with a smaller factory, change the design so it can be built in a smaller factory. If you want to eliminate the need for a large space to store refrigerators that fail final test, change the design so they pass. Yes, these changes are significant. But so are the savings. Yes, a smaller airplane carries fewer people, but it can also better serve a different set of customer needs. And, yes, to radically reduce the weight of a product will require new materials and a new design approach. If you want to reduce the cost of your factory, change the design.
If you want to reduce the cost of the machined parts, change the geometry to reduce cycle time and change to a lower-cost material. Or, change the design to enable near-net forging with some finish machining. If you want to reduce the cost of the injection molded parts, change the geometry to reduce cycle time and change the design to use a lower-cost material. If you want to reduce the cost of the 3D printed parts, change the design to reduce the material content and change the design and use lower-cost material. (But I think it’s better to improve function to support a higher price.) If you want to reduce the cost of your parts, change the design to make possible the use of lower-cost processes and materials.
If you want to reduce the material cost of your product, change the design to eliminate parts with Design for Assembly (DFA). What is the cost of a part that is designed out of the product? Zero. Is it possible to wrongly assemble a part that was designed out? No. Can a part that’s designed out be lost or arrive late? No and no. What’s the inventory cost of a part that’s been designed out? Zero. If you design out the parts is your supply chain more complicated? No, it’s simpler. And for those parts that remain use Design for Manufacturing (DFM) to work with your suppliers to reduce the cost of making the parts and preserve your suppliers’ profit margins.
If you want to sell more, change the design so it works better and solves more problems for your customers. And if you want to make more money, change the design so it costs less to make.
Resurrecting Manufacturing Through Product Simplification
October 2nd, 2024
Product simplification can radically improve profits and radically improve product robustness. Here’s a graph of profit per square foot ($/ft^2) which improved by a factor of seven and warranty cost per unit ($/unit), a measure of product robustness), which improved by a factor of four. The improvements are measured against the baseline data of the legacy product which was replaced by the simplified product. Design for Assembly (DFA) was used to simplify the product and Robust Design methods were used to reduce warranty cost per unit.
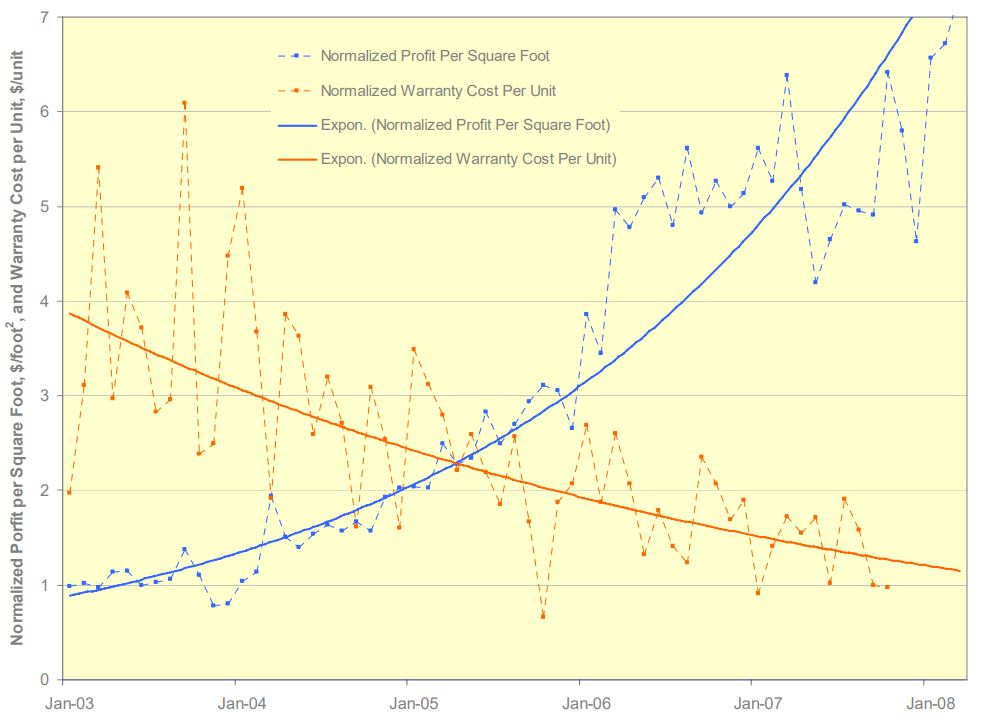
I will go on record that everyone will notice when profit per square foot increases by a factor of seven.
And I will also go on record that no one will believe you when you predict product simplification will radically improve profit per square foot.
And I will go on record that when warranty cost per unit is radically reduced, customers will notice. Simply put, the product doesn’t break and your customers love it.
But here’s the rub. The graph shows data over five years, which is a long time. And if the product development takes two years, that makes seven long years. And in today’s world, seven years is at least four too many. But take another look at the graph. Profit per square foot doubled in the first two years after launch. Two years isn’t too long to double profit per square foot. I don’t know of a faster way, More strongly, I don’t know of another way to get it done, regardless of the timeline.
I think your company would love to double the profit per square foot of its assembly area. And I’ve shown you the data that proves it’s possible. So, what’s in the way of giving it a try?
For the details about the work, here’s a link – Systematic DFMA Deployment, It Could Resurrect US Manufacturing.
Posted in Assembly Time Reduction, Bottom Line Growth, Cost Savings, Design Engineers, DFA, DFMA, Downstream Savings, Floor Space, Fundementals, How To, Lean, Manufacturing Competitiveness, Part Count Reduction, Product Development, Product Robustness, Robust Economy, Seven Wastes, Top Line Growth |
No Comments »
How Startups Can Move Prototypes Out Of The Lab And Onto The Factory Floor
June 19th, 2024
 Startups are good at making something work in the lab for the first time. However, startups are not good at moving their one-in-a-row prototypes to the manufacturing floor. But if startups are to scale, that’s exactly what they must do. For startups to be successful, they must continually change the design to enable the next level of production volume.
To do that, I propose a 10, 100, 1000 approach.
After the one-in-a-row prototypes, how will you make 10? Can the crude assembly process produce 10 prototypes? If so, use the same crude assembly process. The cost of the prototypes is not a problem at this stage, so there’s no need to change the manufacturing processes to reduce the cost of the components. And at these low volumes, it’s unlikely the existing assembly process is too labor intensive (you’re only making 10) so there’s likely no need to change the process from a “time to build” perspective. But if the variation generated by the assembly process leads to prototypes that don’t function properly, the variation of the assembly process must be controlled with poke-yoke measures. Add only the controls you need because that work takes money and time which you don’t have as a startup. Otherwise, build the next 10 like you built the first one.
After the first 10, how will you make the next 100? Building 100 units doesn’t sound like a big deal, but 100 is a lot more than 10. Do you have suppliers who will sell you 100 of each part? Do you have the factory space to store the raw materials? Do you have the capability and capacity to inspect the incoming material? Do you have the money to buy all the parts? If the answer to all these questions is yes, it’s time to ask the difficult questions.
The cost of the units is likely still not a problem because the volumes are still small. There’s likely no need to change the manufacturing process (e.g., moving from machining to casting) to reduce the cost of the units. And it’s unlikely the time to build the units is becoming a problem because a super long build time isn’t all that problematic when building 100 units. So it’s not time to reduce the number of parts in the product (product simplification through part count reduction – aka, Design for Assembly). But it’s likely time to reduce the variation of the assembly process and eliminate the rework-inspect-test loop that comes when each unit that emerges from the production process is different. It’s time for assembly instructions, assembly fixtures, dedicated tools at each workstation, measurement tools to inspect the final product, and a group of quality professionals to verify the product is built correctly.
After the first 100, how will you make the next 1000? If you can, avoid changing the design, the manufacturing processes, or the assembly process. Keep everything the same and build 1000 units just as you built the first 100. But that’s unlikely because the cost will be too high and the assembly time will be too long. For the most expensive parts, consider changing the manufacturing process to one that can support higher volumes at a lower cost. You likely will have to buy the parts from another supplier who specializes in the new process and for that, you’ll need a purchasing professional with a quality background. To reduce build time, do Design for Assembly (DFA) to eliminate parts (fasteners and connectors). And for the processes that generate the highest rework times and scrap, add the necessary process controls to reduce variation and eliminate defects. Do the minimum (lowest investment dollars and design time) to achieve the appropriate cost and quality levels and declare success.
After 1000 units, it’s time to automate and move to new manufacturing processes. For the longest assembly processes, change the design (the parts themselves) to enable automated assembly processes. For the highest cost parts, change the parts (the design itself) to enable the move to manufacturing processes with lower cost signatures. The important idea is that the design and its parts must change to automate and enable lower-cost manufacturing processes. You’ll need new suppliers and purchasing professionals to bring them on board. You’ll need quality professionals to verify the quality of the incoming parts and the output of the assembly process. You’ll need manufacturing and automation engineers to simplify and automate the manufacturing processes.
The 10, 100, 1000 process is rather straightforward but it’s difficult because it requires judgement. At what production volume do you move to higher volume manufacturing processes to reduce costs? At what production volumes do you change the design to automate the assembly process to reduce assembly time? At what point do you add assembly fixtures to reduce variation? Which assembly processes do you improve and which do you leave as-is? When do you spend money on improvements and when do you buckle down and grind it out without making improvements?
The answer to all these questions is the same – hire a pro who has done it before. Hire a pro who knows when (and how) to do Design for Manufacturing and when to keep the design as it is. Hire a pro who knows when (and how) to add poke-yoke solutions and when to keep the assembly process as it is and rework the defects because that’s the lowest cost and fastest way to go. Hire a pro who knows when to change the design to reduce assembly time (Design for Assembly) and when to change the design and invest in automated assembly. Hire a pro who knows how (and when) to implement a full-blown quality system.
When it’s time to move from the lab to the factory floor, it’s time to hire a pro.
Image credit — Jim Roberts Gallery
Posted in Assembly Time Reduction, DFA, DFMA, Part Count Reduction, Seven Wastes |
Tags: Design for Assembly, DFMA Culture, Part Count, Product Design |
No Comments »
 Mike Shipulski